Go back
Animating SVGs with Remotion
Oct 11, 2022 · 6 min read
I've been contributing to Remotion for a while now, and this time around I tried implementing an example that'll walk people through the process of exporting designs from Figma and creating Programatic videos with it.
Say you're collaborating as a Frontend Engineer with a design team, and you want a way to get a real-time representation of some design assets you have on Figma.
You can export a design from Figma as an SVG file and import it as a React component in Remotion.
Open the Figma design
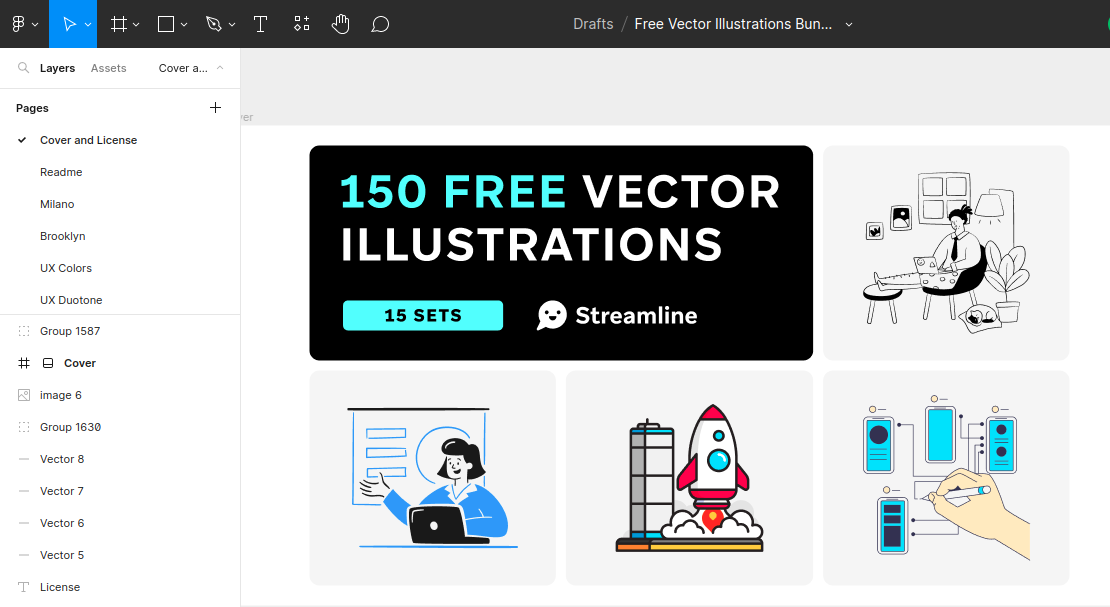
The design we'll consider here is a suite of 2D graphics made by Streamline for the design community. You can get a copy here. When you click the link to the design, you can select from the list of designs available — in the sidebar
You do not necessarily have to use this specific design set. But, you should crosscheck to know the type of SVG file you want to export or copy is a pure SVG file, not one that exports an image file as SVG, a typical example would be similar to the snippet below.
<svg
  width="2160"
  height="2160"
  viewBox="0 0 2160 2160"
  fill="none"
  xmlns="http://www.w3.org/2000/svg"
  xmlnsXlink="http://www.w3.org/1999/xlink"
>
  <rect width="2160" height="2160" fill="url(#pattern0)" />
  <defs>
    <pattern
      id="pattern0"
      patternContentUnits="objectBoundingBox"
      width="1"
      height="1"
    >
      <use xlinkHref="#image0_11_37" transform="scale(0.000462963)" />
    </pattern>
    <image
      id="image0_11_37"
      width="2160"
      height="2160"
      xlinkHref="data:image/png;base64"
    />
  <defs>
</svg>
The snippet above does not represent a pure SVG file, because it literally just exports an image and wraps in the <svg> element. A proper SVG file would have all the corresponding <path /> elements that we can animate conveniently.
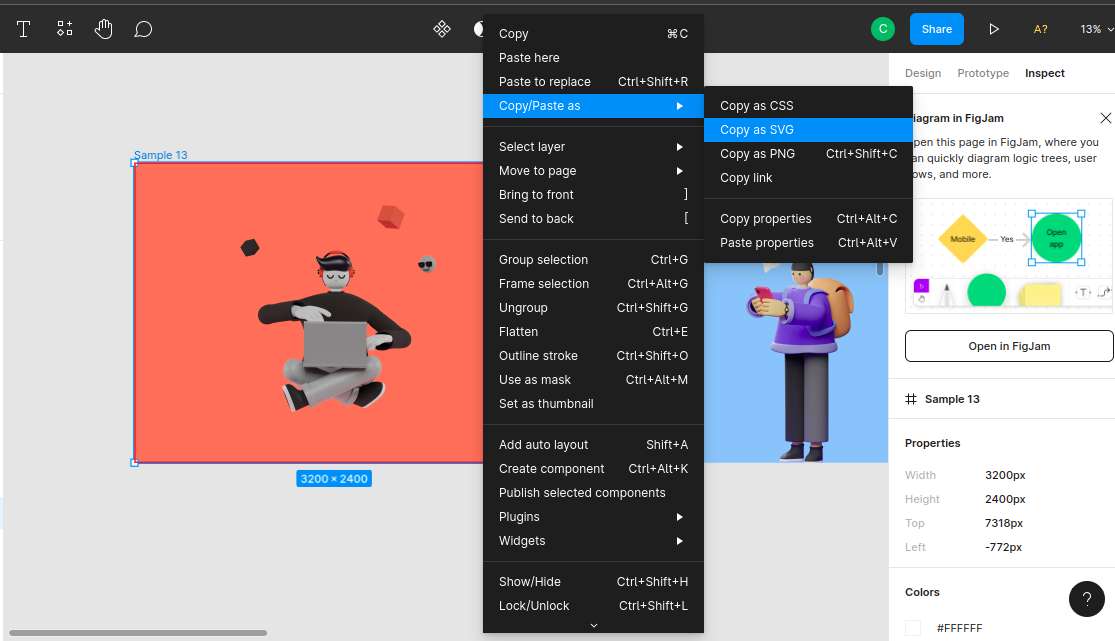
You can export any design by copying it as an SVG file — you can do that by right-clicking on the design itself and selecting the Copy/Paste as option
With that out of the way, you'll need a way to represent this SVG as a react component, because of the camelCase attributes naming convention in React, the react-svgr playground eases the burden of this process for us.
Grouping vector elements in Figma
This part is a bit important if you want to get a seamless representation of the animations you're trying to create with Remotion.
By default, and sometimes, the designs you want to export as an SVG file will have scattered vector elements, you'd need to group these elements into independent structures.
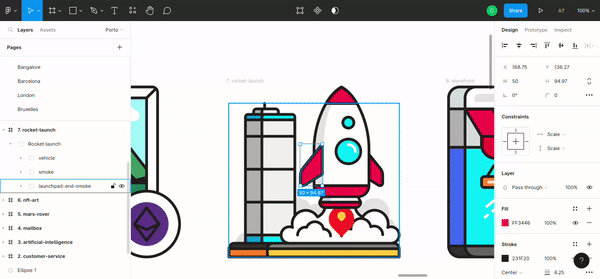
Take for example the Rocket SVG that we'll animate. When you take a look at the illustration below, you'll see various parts of the Rocket already grouped into primary components: Vehicle, smoke and the launchpad.
You can select elements that you want to animate and group them with these key combinations Ctrl + G if you're on a Windows machine or Command key + G if you're on a Mac.
When you group the SVG by adding smaller chunks of the elements to a larger component or structure, you make it easy for it to be animated or styled individually.
Using the file in Remotion.
Now that you have exported the SVG file and retrieved it in the appropriate JSX syntax from react-svgr playground. You can copy and paste the file into your remotion project or create reusable components from it.
Let's try animating the vehicle group. I'll just go ahead and take a section of the vehicle structure for brevity's sake.
import { AbsoluteFill, useCurrentFrame, useVideoConfig } from 'remotion'

export const Rocket: React.FC = () => {
  const frame = useCurrentFrame()
  const { fps } = useVideoConfig()

  return (
    <AbsoluteFill
      style={{
        backgroundColor: 'pink',
        justifyContent: 'center',
        alignItems: 'center',
      }}
    >
      <svg
        width="800"
        height="800"
        viewBox="0 0 394 394"
        fill="none"
        xmlns="http://www.w3.org/2000/svg"
      >
        <g
          id="vehicle"
          style={{
            transform: `scale(${scale}) ${launch}`,
            transformOrigin: 'center center',
            transformBox: 'fill-box',
          }}
        >
          // vehicle's paths
        </g>
      </svg>
    </AbsoluteFill>
  )
}
You'll notice that we're having some values assigned in the style prop in the <g> element. Let's take a look at them in a detailed manner.
const up = spring({
  fps,
  frame: frame - 20,
  config: {
    damping: 20,
    mass: 15,
  },
})

const scale = spring({
  fps,
  frame,
  config: {
    mass: 1,
    stiffness: 200,
  },
})

const launch = `translateY(${interpolate(up, [0, 1], [0, -3000])}px)`
The spring library in Remotion can be used to create smooth animations, by taking the current frame of the video — which we obtain from the useCurrentFrame() hook — into consideration.
The launch variable as the name implies animates the rocket by taking it — 3000px — out of the viewport.
${interpolate(up, [0, 1], [0, -3000])The interpolate function allows us to map a range of values to another one, in this scenario, we're mapping the initial spring animation up, the current frames [0, 1], and how far we want the rocket to be displaced from the viewport.
In a simpler form, we're using the interpolate function to animate the rocket by telling it to launch the vehicle when the video is in its first frame — 3000px out of the viewport.
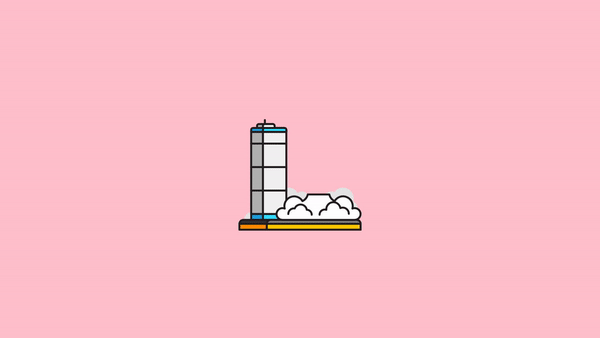
When you're done with that, you can use the component alongside Remotion's built-in Composition component. The illustration below shows what the result looks like, but you can still take a look at the result in this repo.

One thing to note when you're working with SVGs is that CSS transforms work differently with them than they do when we're trying to animate conventional HTML elements. That's why I included the transformBox and transformOrigin properties in the previous snippet like so:
<g
  id="vehicle"
  style={{
    transform: `scale(${scale}) ${launch}`,
    transformOrigin: 'center center',
    transformBox: 'fill-box',
  }}
></g>
If I don't set the value of transformOrigin = "center center", the animation would start from the top left corner, and we do not want that. Take a look at what the animation looked like before I added these attributes.
I'll try working on the other structures of the SVG, hopefully, I'd have something cool to share with you when it's done. If you want to try something similar, you can read up about the process of setting up a Remotion project from the docs.